

As a crocheter, I find it necessary to crochet my own home decor, especially for the holidays. Not only is it fun to create things, I also end up with decorations that no one else has!
We recently bought a new house and our powder room is rather plain. To jazz that room up a bit when I have my family over for Thanksgiving, I am definitely placing this turkey toilet roll cover in the powder room!
Supplies:
Category 4/Worsted weight yarn
~1 skein Tan
~16 yds. each of 4 colors for feathers
~Small amounts of white, red & brown for face
US Crochet hook G-6 (4.00 mm)
US Crochet hook I-9 (5.5 mm)
2 black buttons ( ½ inch)
Tapestry needle
Abbreviations:
Ch = Chain
SC = Single Crochet
HDC = Half-double Crochet
DC = Double Crochet
TR = Triple Crochet
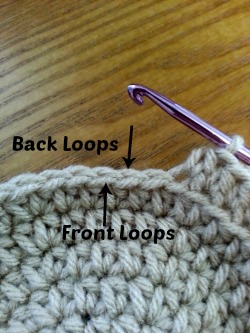
BLO = Back Loop Only
Size: 4 ¾ inches wide by 4 ¼ inches tall
BLO - The upper part of a stitch has two loops that form a “V”.
For HDC, yarn over and insert hook into the loop farthest from you.
Finish stitch as normal.
Invisible join - Join your rounds in the first stitch, NOT in the beginning chain.
Start your rounds in the same stitch as the beginning chain.
This will create an invisible seam.

Crochet with 2 strands - Holding two strands of yarn together, make the knot that will go onto your crochet hook. Crochet as you normally would, holding both strands together, making sure you insert your hook through all 4 loops of the stitch in the previous row. This may take some practice until you get the hang of it, so have some patience and take your time.
Making feathers - The easiest way to use two strands of yarn to make the feathers is to have two separate skeins of yarn. Trying to use both ends of one ball will only result in knots and a lot of frustration. Trust me, I’ve tried. If you don’t have (or don’t want to buy) two skeins of yarn for one feather, I do have a tip for you. Hold one end of the yarn between your index finger and thumb. Not pulling too tight, wrap the yarn around your elbow and bring it back up to your fingers. If you do this 8 or 9 times, you should have enough yarn to be able to create the feathers.
And now onto the pattern!
Cover
With tan and G-hook
Ch. 4, join
Round 1: Ch. 2, 8 HDC into ring
Round 2: Ch. 2, 2 HDC in each - 16
Round 3: Ch. 2, HDC in next, 2 HDC - 24
Round 4: Ch., 2, HDC in next 2, 2 HDC - 32
Round 5: Ch., 2, HDC in next 3, 2 HDC - 40
Round 6: Ch., 2, HDC in next 4, 2 HDC - 48
Round 7: Ch., 2, HDC in next 5, 2 HDC - 56
Check your measurements beginning in round 6. The top of the cover should hang slightly over the edge of the toilet paper roll. If a larger size is needed, add 1 HDC to each round after round 7 (ie. HDC in next 6, 2 HDC)
Round 8: HDC in BLO
Round 9: Working through both loops, Ch. 2, HDC around - 56
Rounds 10-17: Ch. 2, HDC around - 56
Fasten off
Feathers - make 4
I-hook
Working with two strands of yarn and leaving a long tail when making the knot to go onto your hook
Ch. 17
SC in the 2nd chain from the hook
SC in the next 2
HDC in the next 4
Dc in the next 6
TR in the next 2
6 TR in the last
Now you will work on the other side of the beginning chain
TR in the next 2
DC in the next 6
HDC in the next 4
SC in the next 3
Join to the first SC and fasten off

Eyes - make 2
With white and G-hook
Ch. 3, join to first chain to form a ring
Ch. 1, 10 SC into the ring, join
Ch. 1, 2 SC in each stitch around, join - 20
Fasten off, leaving a long tail
Sew a black button to the center of each eye
Nose
With brown and G-hook
Ch. 7
Slip stitch into the 2nd chain from the hook
SC in the next
HDC in the next
DC in the next 2
TR in the last
Fasten off, leaving a long tail
Snood (aka. the red thingy)
With red and G-hook
Ch. 8
3 SC in the 2nd chain from the hook and in each stitch across - 21
Fasten off, leaving a long tail

Using a tapestry needle, sew the face to one side of your cover.
Line the feathers up along the opposite side of the cover and sew into place.
Weave in all your loose ends, cover a roll of toilet paper and enjoy your new bathroom decoration!


I take great pride in my work. I ask that you do not redistribute or sell this pattern or modify it in any way and claim as you own. Please feel free to make as many as you want for your own personal use or to sell at craft fairs, on your own personal website or on marketplace websites, such as Etsy. I would appreciate a link to my site in your listing, http://www.CuppaStitches.com
This comment has been removed by a blog administrator.
ReplyDeleteI have read a few of the articles on your website now, and I really like your style of blogging. I added it to my favorites blog site list and will be checking back soon. Please check out my site as well and let me know what you think. portable toilet hire
ReplyDeleteRegardless of whether you're new an accomplished knitter or not, you can generally find out additional, and become increasingly innovative, which will imply that you can weave more things. Weaving examples are an incredible method to improve your sewing capacity.
ReplyDeleteKnitting kits
Crocheting is certainly not my specialty. If you asked me a week back what it was all about, you would have gotten a blank stare, or a lame reason like; well, it's a similar thing as knitting except the needles have hooks at the end so it catches the yarn and loops into the opposite side Free Crochet Patterns
ReplyDeleteKnitting is commonly used to make clothing and accessories such as hats, scarves, sweaters and gloves, as well as blankets and afghans. Kierrosmittari
ReplyDelete